
techie
-
how to create a title
-
how to make the URL more meaningful (tbf, I don’t know how to do that through the browser as yet)
-
how to attach a photo
-
how to post to the testing blog rather than the default one
- create a function to select a particular post, download it, edit in in vim or vscode, then post the new version
How to set default parameters for other people's Powershell cmdlets
Not exactly #TodayILearned because I vaguely remember learning that you can do this, but had never got around to doing so.
This is how you can set a default parameter in Powershell. As far as I know, it works with any cmdlet. I’m using it here to set the default for Pester to show me all the results of all the tests….because I love seeing that sea of green :)
$PSDefaultParameterValues += @{ 'Invoke-Pester:Output' = 'Detailed' }
#Powershell
I got an email about HIMSS24. It stands for ' Healthcare Information and Management Systems Society 2024'….and I’m sure it’s marvellous, but being a sad, techie sort of geek I thought ‘HIMSS24’ looked like a datetime format gone wrong.
Setting up a file-specific (not filetype-specific) colorscheme in vim
Setting up a file-specific (not filetype-specific) colorscheme in vim is a two step process.
First, you need a ‘modeline’[^1] in the file like this: [^1] a ‘modeline’ is a comment with vim instructions in it. My actual modeline for this file is ‘# vim: ft=readme syntax=markdown tabstop=2 shiftwidth=2 softtabstop=2 expandtab’. There’s some explanation of modelines here: https://vim.fandom.com/wiki/Modeline_magic
# vim: ft=readme
‘ft’ here is, somewhat confusingly given my post’s title, short for filetype. The name of the filetype is kind-of arbitrary. It’s probably best to be descriptive, and better if it doesn’t correspond to an actual filetype like .md or ‘markdown’ or ‘txt’
Second, you need like this in your vimrc
autocmd FileType readme colorscheme peachpuff
Why would I do such a thing
I have a couple of ‘big old text files’ open most of the time.
One is for general notes, and a record of what’s happened during the week. The other is when I’m doing a chunky-ish bit of coding which records decisions, todo’s, worries and web-clippings which are specific to that code
Having a separate colour scheme just makes it handier to find either of the files I want when I’m alt-tabbing through my 103 open windows

Vim commands to write out parameter list
Executive summary :)
For each line
0

D

PP
From the colon prompt:
%s/^  */    write-dbg "`

%s/  *\$/: <\$

%s/$/>"

%s/,//g
The gory details
Starting with a parameter clause like this:
Param(
     $Parameter1,
     $Parameter2,
     $Parameter3,
     $Parameter4
)
The manual bits
First, take off the ‘Param(i’, and the bracket at the end
Second, for each line do this:
0
D
PP
… to get:
     $Parameter1,     $Parameter1,
     $Parameter2,     $Parameter2,
     $Parameter3,     $Parameter3,
     $Parameter4     $Parameter4
The colon prompt bits
Replace spaces at the front with the write-dbg, a double-quote, and then a backtick. The backtick is because I need to escape the name of the variable
:%s/^ */ write-dbg "`
This gives:
    write-dbg "`$Parameter1,     $Parameter1,
    write-dbg "`$Parameter2,     $Parameter2,
    write-dbg "`$Parameter3,     $Parameter3,
    write-dbg "`$Parameter4     $Parameter4
Replace the spaces between the repeated variables with ‘: <’
:%s/ *\$/: <\$
….giving:
    write-dbg "`$Parameter1,: <$Parameter1,
    write-dbg "`$Parameter2,: <$Parameter2,
    write-dbg "`$Parameter3,: <$Parameter3,
    write-dbg "`$Parameter4: <$Parameter4
End the string:
%s/$/>"
….which gives:
    write-dbg "`$Parameter1,: <$Parameter1,
    write-dbg "`$Parameter2,: <$Parameter2,
    write-dbg "`$Parameter3,: <$Parameter3,
    write-dbg "`$Parameter4: <$Parameter4
Finally get rid of the commas
%s/,//g
Leaving:
    write-dbg "`$Parameter1: <$Parameter1>"
    write-dbg "`$Parameter2: <$Parameter2>"
    write-dbg "`$Parameter3: <$Parameter3>"
    write-dbg "`$Parameter4: <$Parameter4>"
How to post to micro.blog with powershell
Get the token
Go to the account page in micro.blog, scroll down to the bottom where there is ‘App tokens’ and click on the link which has the text ‘5 apps’ (or however many apps you’ve authorized)
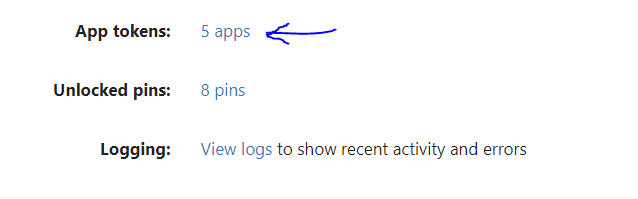
Pick an app name (I went wild with my imagination and called it Powershell), and click on ‘Generate Token’

Reveal the token and Ctrl-C it.
Do the powershell bit
Convert the token into a securestring
$Token = 'whatever-the-token-is' | ConvertTo-SecureString -AsPlainText -Force
Set up the $Body
$Body = @{
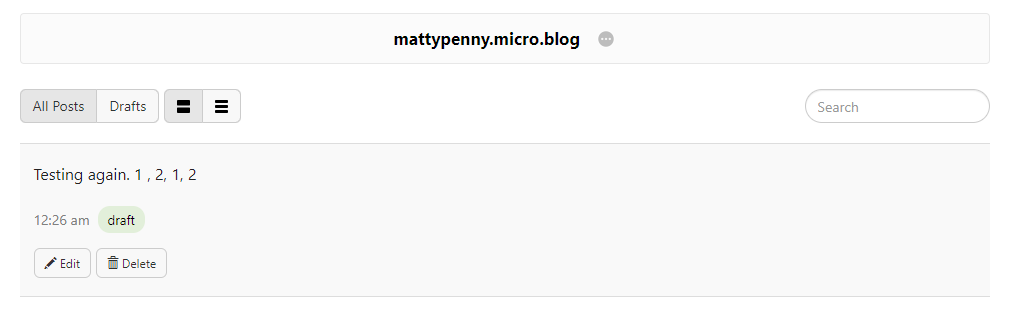
content = 'Testing again. 1 , 2, 1, 2'
h = 'entry'
'post-status' = 'draft'
}
You need the quotes around ‘post-status’ because Powershell doesn’t like hyphens in variable names. I’m keeping this post as draft, because the content is even less interesting than my other posts
Then call invoke-restmethod as follows:
invoke-restmethod https://micro.blog/micropub -Method post -Authentication Bearer -Token $Token -Body $Body
…and Bob’s your uncle
There is, clearly, a lot more really basic stuff that I need to work out:
Then, I’d like to: